Pages

Monday, September 29, 2008

12 Days of Christmas Concertina Card

c


I wanted to make an extra special card for my parents for Christmas this year. I just got Joys Cart and I am into this 12 Days theme right now so couldn't resist these great images to use. It took a while to do but its not too bad. I would not use the Gold Mirror Paper again as its hard to stop it marking with any glue, glitters etc. The true colours have not photographed too well at all they are lovely CHristmas papers and true Christmas Reds and Greens but you can get the general idea.

Here is the cut file http://www.mediafire.com/?gkzgfoj3njcbut please try to work it out from these photo's as it would take ages to type it up
thanks


The List Planner for Christmas


I give full credit for this idea to "Rupesmom" on the Cricut Forums I saw her fab idea and just had to givie it a go. I still need to make the calender and other bits to go in it but her it is so far. I used A3 cardstock in white, DCWV Christmas Papers, my Bind-it All, Glamour dust for the snowflakes and Safmat to make the border stickers, ribbons etc.


Thursday, September 25, 2008

New Ribbon Storage

I am so fed up of my rolls of ribbon going everywhere I made this it took a while to work it out but I am pleased with the result


I


Tuesday, September 23, 2008

Concertina Book from the scrap pack


Having another "fiddle" with this pack of freebies and I came up with this one. Its all made with free papers and embellishments from the same bag I got the stuff to make the exploding box


Monday, September 22, 2008

12 Days of Christmas Card

12 Days of Christmas


*Inspired by the New Set of clear stamps by Penny Black*
Materials Used:
General Purpose Cardstock
Copier Paper
Gold Foiled Paper
Versafine or Stazon
Water Colour Pens and Watercolour paper
Sakura Pens
Snow writer & Glamour Dust
Ribbon & Gems
Nestabilities Scalloped Circle
Stamps, Penny Black & Hero Arts Circle Set
Snowflake punch
Cricut cart & Plantin Schoolbook Cart
Gold Edge Peel-offs
Corner rounder
Cropodile 2 & gromlets
Cuttlebug with Swissdots folder
Glue, DS Tape, Pop-up Dots

Cut File HERE.

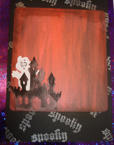
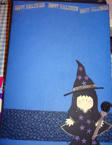
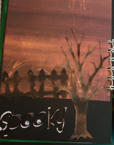
I saw these stamps and immediately thought Advent Calendar. I had plans to make all my cards like this but it took forever to make just one so maybe not !! I think I used just about every technique in the book for this card.

I am pleased with how this turned out as it was really just a trial run but I think it may get sent out now.

Steps:
Cut Flap piece in main colour (here Red) I cut it in half to help with closing as its quite thick if you don’t, any join is hidden by the ribbon. I also trimmed a few mm from each outer edge to stop any white showing at the front and finished this edge with a peel off
Cut flaps on Cricut then finish by hand and adhere (colour side facing front) to the back of the flaps I used (gold)
Stamp images for the inside and front cover and water colour with the pens I have also used some Sakura glitter pens in places. For the snow use the Snow writer and Glamour dust.
Using the flap piece as a guide of where to place them stick these images to a piece of regular copy paper in the correct order of number image ( guess who got this wrong first time round!!!)
Double side tape all round the whole of the flap pieces and stick over the images so that you can see ok through each window.
Stamp and mount the greeting on a scalloped circle, Cropodile a gromlet to the top and add ribbon and pop dot onto the front.
Stamp the front image and colour, mount onto Cuttlebug embossed contrast card. If wanted, punch snowflakes into the mount and back with gold paper to show through and glue to the card. Cut extra snowflakes to finish.
Add a ribbon and job done.

Hope you like it


Thursday, September 18, 2008

Smallest exploding box ever


Ahh this is so cute I was inspired by a freebie pack of scraps from a magazine

Hope you like it

Ribbon storage

I had this box from some chocolates and it proved just perfect to put some reels of ribbon in. Perfect too as its clear and I can see at a glance which ones I need.

Tuesday, September 16, 2008

Halloween Albums

Unlimited Free Image and File Hosting at MediaFire
More on my MediaFire page

Halloween Albums

I have been busy on Albums for my 2 nieces as I love Halloween and so do they.

I have used lots of different tecniques and ideas for this some are:

K & Co Papers and Embellishments, Cricut Shapes, Mica Powders over Versamark to give some of the shimmer, Stamping, Brilliance Inks, Cuttlebug Folders etc.

Hope you enjoy them

To view the rest please click photo


Unlimited Free Image and File Hosting at MediaFire


Sunday, September 14, 2008

Our new company van & Cricut


Well I am pleased with result it turned out ok but a lot of work

Saturday, September 13, 2008

Halloween Cards


I adore Halloween and the colours you can go mad with when making cards etc. I have made a start on the invitations for the party, we always have one for adults we are such big kids really.


I have used K & Co Papers, Cuttlebug Halloween folders, Willow Design stamps they are just so cute and coloured using Marvy watercolour markers. Nestability Scalloped Circles for the backing mounts and one to stamp onto. A few ribbons, gems and inks and there you go.
The ribbon is straight honest, its just the angle of the photo :-(


Saturday, September 06, 2008

Anniversary Card for my parents

I wanted to make a nice card for them as they celebrate 52 years this year. I hope they like it.

Used Alphalicious & Home Acents carts, heavy vellum, collosal paper pack (a bit like Bazzil bling but cheaper) Vaessen punch for edge, Cuttlebug folders Swiss Dots and Dots border, gems.

Anniversary Card elements used from excess cuts from multi page card, click the pink title to get that

File sharing & Followers

Hurrah I have finally found the way to share my cut files. I have put the link to the ones I have done so far next to the project in colour writting so you can find them.

I hope you enjoy downloading them and trying them as much as I did in creating them.

I have a "Followers" bit on my blog but no-one has joined it yet so please do, I am feeling a bit of a "Billy no mates" :-( and would love to see you there :-) I would also love to hear your comments so come on and tell me what you think
xxxx