Pages

Showing posts with label christmas tree. Show all posts

Thursday, November 01, 2012

Advent Matchbox Calendar

Not quite finished it yet it still needs some other embellishments.  I have had the boxes ready to make this for a couple of years now I just never seems to get round to it.  They are easy to do, if you have "bought boxes" , would take longer if you make your own.  I will post a simple run through of this but it's so easy to do.  
Components: card, boxes glues, numbers (unfortunately these were to big) chipboard for base , middle and top

assemble in lots of three wrapping with a length of card
Use the tape to pull them together, first one way then another layer of tape going in the other direction. Extra strong tape is better

Position then like this, four sets of three per layer with a chipboard piece top and bottom

Add the second layer as before

Drawers only covered at the front otherwise they won't slide easily
 

Add decorations and number in a random fashion

This looks wonky but its the camera angle :-(


Top


Min scroll inside the last box
A letter from Santa
I just love the cute appeal of it.  I have made one before HERE which is substantially larger which I love but this one is for my Grandsons.  I hope it can take the rigors of two small boys :-)

Useful links:
Pre-made boxes to buy
Template
Super large size template
More templates
Matchbox fun things to try

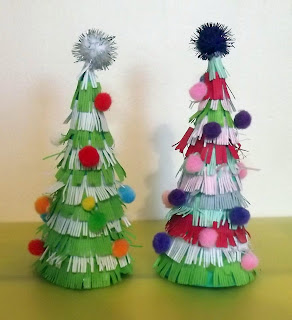
A Quilled Christmas Tree


This little tree measures about 5 inches high and was an experiment as a topper for my Matchbox Advent Calendar (details to follow)


  • I just cut a 7" circle and used one quarter curled round to make a cone shape.
  • put double sided tape round at 1/2 increments all the way up ( this varies on the size of your cone, less of a gap makes a fuller tree)
  • use frilled quilling paper or make your own by snipping/fringing 1/2 inch wide lengths of coloured paper, the larger the tree the wider the paper would need to be
  • stick round the cone so that each layer slightly overlaps
  • fluff up the frill to make it stick out
  • add some mini pompoms
your done :-)   You can make this any size you wish, or even a whole forest of them.
TFL
xx


Monday, October 29, 2012

I love Pumpkins (recipe)


 Well I managed to get all my Halloween gifts sorted out yesterday. The treat bags are stuffed, cards written,  the pumpkin lantern is made and the insides of Mr Franky are cooked up ready to make some 

Pumpkin Muffins

  • How to do them: scoop out pumpkin insides discarding the seeds and stringy bits. You can wash and toast the seeds as a snack they are delish but it's a bit tedious taking the shells off.
  • put the flesh, 2 tablesppons of water and 2 tablespoons of sugar in a bowl and microwave for 6 mins or until softened, stir a couple of times while it's cooking.
  • Mash the cooked pumpkin or blend in a processor. You can now make muffins or freeze it for later in a poly bag. or Buy a tin of prepared Pumpkin from Waitrose!
Muffin Ingredients
  • Divide your pumpkin into 2 equal amounts and find a cup that one amount fits in to fill it, this will be your measure for the other ingredients (you can use shop bought measure cups if you wish just follow that rule)
  • put into a mixing bowl,  the 2 "cups" of pumpkin, 
  • 3 cups of plain flour
  • 2 cups of sugar, I prefer brown
  • 2 teaspoons baking powder
  • 1/2 teaspoon of each of the following spices, cloves, cinnamon, nutmeg and allspice or just use 2 teaspoons of Mixed Spice.
  • 2/3rd's of your cup of sunflower or vegetable oil
  • 3 eggs (beat before adding to the mix)
Mix it all together, put into muffin cases, sprinkle with a little sugar for a crunchy top (I use crushed sugar cubes but regular is fine)  and cook for about 25 mins at 180cent, 350 farenheit or Gas 5  
EAT :-)
they will freeze in a plastic bag or box, reheat for a little while after defrosting to freshen them up

xx