Pages

Showing posts with label Autumn. Show all posts

Tuesday, October 13, 2009

Autumn word book and Step Card


This step card was made from a piece of A5 card. The Autumn colour backing papers were made with glimmer mist and adirondack mists just randomly spritzed on and blended. I love the sheen you get from the mica in these. The images were then drawn on the Cricut and cut using the "Load last" function and coloured with Copic pens . The cart is Speaking of winter and Stretch your imagination

~~~~~~~~~~~~~~~~~~~~~~~~~~~~~~~~~~~~~~~~~~~

Autumn Word Book

Not feeling so inspired today till I got my new Cricut Cart out "Speaking of Fall" I love the leaf shaped alphabet and it needed to be tried as a word book. Unfortunately I didn't make the pages quite long enough so you can't read the whole word in one go but its quite small so that did make it a bit more difficult.

This tool 2 A4 sheets of cream card, one sheet of pattern paper, my cricut markers and some images from the "Stretch your Imagination" cart. I have had the markers for some time but not had much luck with using them but thanks to the forums I now know how to draw and then cut without it going out of line :-)

The whole book was designed with the Design Studio Software first.

Then I drew the design with the cricut markers, in case you don't know they fit in the machine where the blade usually goes and instead of a cut it draws, sorry if you knew that :-( Then I pressed load last and put in the cut blade and cut them out. I then coloured all the images with Copic pens, cut some matching paper to make panels on the front and also cut panels for the back. I did that by using the original cut file but loading the paper upside down (white side up) so that when you turn it over it fits on the back of the page. I coloured the extra images with copics too and assembled it and put the ring on to hold it together.

Capture shot of pages being cut A, U, T, U and M
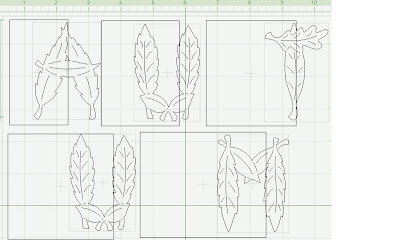

and N
Additional images that I used to embellish itThe finished book.

Wednesday, October 07, 2009

Altered Book


This was a kids board book, these books were 5 for a pound from the charity shop. I just stripped the glossy cover of the pages off and re-used it (its just a chipboard book underneath anyway)

Used lots of Tim Holtz product. The closure is grungeboard and I also used grunge shapes, sprockets, long fasteners and chains. A heart I found in my junk draw!! A variety of Halloween stamps, papers and stickers. The edges are distress inked and verse downloaded from the internet, printed on copy paper and is misted with Mica spray paints.

Tuesday, October 06, 2009

Country Cottage


Still trying to get these right. This was going to be a gingerbread house but I got sidetracked!! lol

Thursday, October 01, 2009

Being Haunted

O'k so I have gone a bit Halloween Crazy :-) I am having a great time even though I am meant to be doing office stuff, food shopping etc etc. lol who has time to eat anyway!! I know what I would rather be doing :-)
xx

Wednesday, September 16, 2009

Autumn and more Copper Cards

** The greeting is matted on rust colour card not pink :-( the flash has caught it badly and makes it look wrong. Thats in answer to a conversation I had the other day ;-)

I did a major clear out over the weekend and found a lot of card that I bought ages ago in colours I am not keen on, but it has come in handy for these cards. I made it a project to try and use some of it and I am having a lot of fun with what I have made so far.

If you want to have a go at a similar card to this here is how I made it.

I embossed some of this metalic pearl paper with the Cuttlebug, a bit of fiddling and I got a fairly even coverage of the leaves using the embossing folder
I then rubbed the raised parts with Versamark and rubbed some pearl mica powder over in copper and other metalic colours. It doesn't show too well here but it has a fab multicolour sheen.
I had this copper card but it was a bit too bright so by rubbing a Brown Stazon pad over the edges and rubbing it the ik took away some of the sheen to make a matt with
now looks like this
I stamped some leaves around the edge of the Mink Pearl card base and heat embossed it with clear powder
With the cutting folder of the set I cut 6 leaves and embossed them in the Cuttlebug, then I rubbed them with brown, red, yellow and dark orange stazon to give an Autumn colour effect
Stamp and matt a greeting onto Core'dinations and rub the edges with a mini sander tool to distress it
Matt the paper onto the bronze matt then onto the main card and add the leaves with some decoupage pads and some just flat to give a raised effect and thats the card finished. I hope you like some of the effects I have used here.


These are double embossed images mounted onto simple cards and the papers I made yesterday made into cards

Tuesday, September 15, 2009

Autumn colour


I love the colours of Autumn so in advance I made this with those colours in mind. I used pearl card in a mink colour (looks beige here ) Embossed with Personal Impressions stamps Swirls and heat embossed with copper powder. Stamped the Seasons Trees (Docrafts stamps) and embossed with copper again. Matt onto Core'dinations and edge with copper tape, beware this is sharp stuff I am still bleeding, pain in the name of art, lol. Add an embossed greeting and some leaf brads and thats it.

This was a bit hard to photograph because of the metal finish on it.

********************************
Brayer TechniquesThe girls at Kraft Crazy were playing with these ideas last week and I just had to get my brayer out and exercise it as its been in confinment for a while. I used torn paper to mask sections to try to get the effect of hills, a circle for the sun and then stamped over with some tree stamps. This is fun to do as you never know quite what you will get. I will make them up into cards when I get a moment.

thanks for visiting
xxx