Pages

Showing posts with label mini album. Show all posts

Saturday, September 22, 2012

Quotations mini book


Nestabilities mini album I made as an alternative to a Birthday Card for my friend.

Used:
Plain cardstock
patterned paper Basic Grey
Cuttlebug folders
Nellie Snellen Frame Die
Paper and fabric flowers
Binding ring
eyelets
Cropodile
Ribbons
Colourbox Eye chalks
Blending tool and foam
Grungeboard die cut shapes
Brads

Friday, November 06, 2009

Folded Album and Fab New Stamps


I love this fold its just so easy and makes the most delightful mini books cards and albums. This is for my mum to put some Christmas Photo's of Noah in, my Grandson her Great Grandson!!

I saw these stamps advertised and demonstrated and I think they are just amazing. You get outer edges and inner circles which fit onto a special stamp block and with the ability to mix and match you get a fabulous selection per pack. This has 4 outers and 4 inners which gives 16 different options, now that great value for money. They are from Once upon a stamp called Just Rite find them here. The beauty of them is that apart from those features they are also designed to fit your Nestabilities, how cool is that. They stamp beautifully, wonderful clear images with fine lines and some fantastic sentiments too. Check them out.I went for a large set which includes the quality wooden stamp block and another set of the same size to go with it as it works out cheaper that was to get the wooden blocks. You will be seeing them on a few projects that are coming up. Gosh they need to give me a job with this advertisment I have done!! no I don't work for them, honest I just think they are great quality stamps :-) The stamped images are from the extra set I bought and coloured lightly with Copics ready for a card project.

Tuesday, November 03, 2009

Magnetic Nestabilities folder


This little folder is a quick project I made today to store my Nesties in.

The magnet is from my Xyron Creative station but you can buy magnet sheets lots of places now quite cheaply if you look around. CD/DVD pockets from a record store, Card, papers and glue.

  1. Cut 2 covers from mount board (or any thick card) at 6" x 6" and cover with your chosen paper
  2. cut strips of firm card to make the spines at 5" x 1 3/4" and stick one to the back of each plastic folder, I used ultra sticky tape.
  3. Bind with your bind it all or use rings (you can add more pages easier that way if needed) I like the bound option.
  4. Make a strip of folded paper (for strength) and use brads to attach this to the front as a closure
  5. Make another strip to fix from back to front which will slide under the closure to keep the book closed as shown and attach with brads
  6. Cut pieces of magnet sheet at 5"x5" and put your nesties on and put in the pockets
  7. Add decoration as you wish and thats it :-)
Any questions please feel free to ask and I will be happy to help :-)

Fold frame mini book


I love the fold that makes these, unfortunately its hard to talk you through but it was featured on You Tube here.

I used the Blonde Moments papers again for this little project

Sunday, October 18, 2009

2009 List

I forgot to post this last week. This is The List for this years Christmas Organising. I have added pages for Cards, Presents, Food etc. I printed some out on the PC, made pockets for receipts, stamps and other bits. I bought this tab book but it made me see just how much I need a deep cut housing for my Cricut so I can make my own. The papers are Basic Grey Eskimo Kisses. It only took about an hour but will save me loads of time in the long run :-)

Tuesday, October 13, 2009

Autumn word book and Step Card


This step card was made from a piece of A5 card. The Autumn colour backing papers were made with glimmer mist and adirondack mists just randomly spritzed on and blended. I love the sheen you get from the mica in these. The images were then drawn on the Cricut and cut using the "Load last" function and coloured with Copic pens . The cart is Speaking of winter and Stretch your imagination

~~~~~~~~~~~~~~~~~~~~~~~~~~~~~~~~~~~~~~~~~~~

Autumn Word Book

Not feeling so inspired today till I got my new Cricut Cart out "Speaking of Fall" I love the leaf shaped alphabet and it needed to be tried as a word book. Unfortunately I didn't make the pages quite long enough so you can't read the whole word in one go but its quite small so that did make it a bit more difficult.

This tool 2 A4 sheets of cream card, one sheet of pattern paper, my cricut markers and some images from the "Stretch your Imagination" cart. I have had the markers for some time but not had much luck with using them but thanks to the forums I now know how to draw and then cut without it going out of line :-)

The whole book was designed with the Design Studio Software first.

Then I drew the design with the cricut markers, in case you don't know they fit in the machine where the blade usually goes and instead of a cut it draws, sorry if you knew that :-( Then I pressed load last and put in the cut blade and cut them out. I then coloured all the images with Copic pens, cut some matching paper to make panels on the front and also cut panels for the back. I did that by using the original cut file but loading the paper upside down (white side up) so that when you turn it over it fits on the back of the page. I coloured the extra images with copics too and assembled it and put the ring on to hold it together.

Capture shot of pages being cut A, U, T, U and M
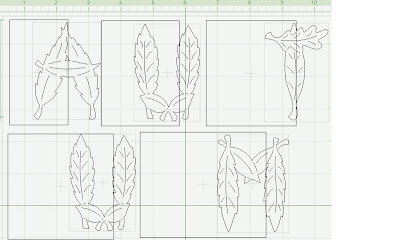

and N
Additional images that I used to embellish itThe finished book.

Wednesday, October 07, 2009

Altered Book


This was a kids board book, these books were 5 for a pound from the charity shop. I just stripped the glossy cover of the pages off and re-used it (its just a chipboard book underneath anyway)

Used lots of Tim Holtz product. The closure is grungeboard and I also used grunge shapes, sprockets, long fasteners and chains. A heart I found in my junk draw!! A variety of Halloween stamps, papers and stickers. The edges are distress inked and verse downloaded from the internet, printed on copy paper and is misted with Mica spray paints.

Tuesday, October 06, 2009

Country Cottage


Still trying to get these right. This was going to be a gingerbread house but I got sidetracked!! lol