Pages

Thursday, November 29, 2012

Hooked on balls!!


O'k so I am totally hooked on these fabric decorations.  They consist of polystyrene Balls and Eggs so far.  The idea of these decorations with fabric which I love and no sewing (don't hate just haven't the patience) is so satisfying.  I admit that breaks are needed, even when using a thimble as it makes your fingers very sore, but the results are more than worth it.

Today I tried the Quilted effect balls and this is my first effort at it.  Do have a try it is really easy and there are a multitude of videos and tutorials on the net to get you going.  I think I like the ribbon cones best but it's hard to call as they are all different, I like the concept and they are a little different.

Have fun
xx

Saturday, November 24, 2012

Mini Fabric Windmills - Pinwheels

Little Fabric windmills to hang on the tree

Method:
  • Iron double sided bonding web to some pieces of fabric (you don't have to do all the patterns just half as they will be fused to the others), peel off the backing and iron onto another pattern fabric
  • cut into 3" squares or any size you like.  I made some with several sizes layered which where effective, 3 inch 2 inch and one inch, harder to get the needle through but they looked pretty
  • cut from corner about 2/3rds of the way into the middle 
  • bring needle through from the back and catch each alternate corner then pass thread back down through to secure the "sails" in place.
  • add a button and hanging thread
  • done

Drinks Coasters

I came across a box of small white tiles in the garage in my rummaging.  Needless to say they are no longer white!!  I made them into Coasters for the Craft Fair next weekend.
These have been dripped with Alcohol Ink which gives a funky effect
I stamped these with a regular stamp and Stazon and it turned into white writing, of course silly me it's alcohol  based too!!  Used a gold and silver markers to paint round the edges
More dripping and some metalics. I gave them all a couple of coats of Matt Spray Varnish to seal the inks and added some felt to the backs to make them table friendly and they took very little time really.
TFL
XX

Monday, November 19, 2012

Christmas Fair packaging it up

Oldies but goodies
Some hearts on a cord for hanging as a Garland, I love all that Jingling :-)
I spent the weekend doing a review of all the items I have made for the fair so far and it was quite a lot.  It's not till you get round to packaging it that you see how much is there.  I am pleased with it so far and now it's in bags looks so nice.  I think I enjoy making the packaging as much as doing the actual crafts.

I love these and adapted the size to fit the chocolate bars I have.  You can get the art work here and also other beautiful designs by Laurie   Aimee Asher Boutique has so many lovely designs to use in your crafting.
Snowman Lolly
They look so jolly all together
Candycane Mice - I used foam sheet instead of felt for a change, they keep their shape better
Red bow, holly and snowflakes are cut from felt with a  Lea'bilities Die
I love Meeses to pieces :-)

Saturday, November 17, 2012

Ribbon Pinecones


I found these while browsing through the other day and just love them.  This is my first attempt but I am pretty pleased with how they turned out.  The ones I saw were more" uniform" but I like the slightly uneven spacing, I think it looks more natural.  If I get time I might make a few for the Craft Fair but they take a while so will have to see.  I also had a go with strips of ribbon, I always have to try a different version of anything I make.  I am quite pleased but they need a little work.
TFL
x

Thursday, November 15, 2012

Easy Christmas Wreath


In my tidying up I found a load of things I had bought, some years ago for various projects and never had the time to do or just plain forgot.  Among these was a tin with florist bits and bobs and a couple of florist hoops.

This is a Super easy wreath and it took about 30 mins tops to make. Hope you like it
Poor light it looks dull here :-(
 
Needed:

  • Florist metal hoop
  • green florist tape and florist wire
  • ribbon about 3 meters
  • pine and larch cones
  • gold stars (table confetti ones) or fake berries etc
  • hot glue gun
  1. Cover the hoop in the tape 
  2. Tie lengths of ribbon all round, I used some wired pattern to add sparkle amongst the plain ribbon
  3. Hot glue the cones and stars
  4. Make a loop of wire to hang it up
  5. Done, That's how easy it was
TFL
xx

Decorating

Well it has never taken me so long to paint a room, well two rooms actually.  I am on the final run now and hope to finish today as, to be honest, I am bored with it now.  I want to get back to my craft room and make stuff for the Fair.  

Finally got the confirmation that I did have a place, which is a relief because I have made quite a bit to sell already.  I sorted out all the cupboards and drawers while I was getting straight and found some very useful Christmas magazines, gold stars I forgot I bought and a load of ribbon !!!

Even Betsy is tired after all the painting, she feels the need to follow me at all times so my being constantly on the move has worn her out.
We played dressing up for a little light relief :-)

Saturday, November 10, 2012

Craft Fairs and a kind of crazy

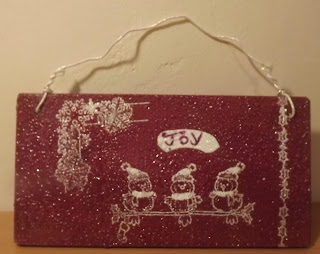
So, every year about this time I go into a panic mode that the house looks awful and I start to decorate.  It has been known to happen during December!! and after a sleepless night I start stripping rooms out ready to paint.  Why?  no idea, just love the smell of fresh paint and having a nice clean backdrop to put up the decorations. I figure that with all the "busyness" of the season why not add a bit more.lol  I am also trying to get things ready for a craft fair so a load of making is needed and throw into the mix a big family lunch party for the 1st December and you have a recipe for stress.  I love it :-)

So between my painting sessions I have made these hanging signs, I thought I would share with you.  I used a variety of stamps including, Woodware "Partridge ina pear tree", Hero Arts, Penny Black etc.  Embossing powder, acrylic paint, pretty wire, Glamour Dust glitter, inks and bells.
TFL

Glitter never photographs well :-(


xx

Thursday, November 01, 2012

Advent Matchbox Calendar

Not quite finished it yet it still needs some other embellishments.  I have had the boxes ready to make this for a couple of years now I just never seems to get round to it.  They are easy to do, if you have "bought boxes" , would take longer if you make your own.  I will post a simple run through of this but it's so easy to do.  
Components: card, boxes glues, numbers (unfortunately these were to big) chipboard for base , middle and top

assemble in lots of three wrapping with a length of card
Use the tape to pull them together, first one way then another layer of tape going in the other direction. Extra strong tape is better

Position then like this, four sets of three per layer with a chipboard piece top and bottom

Add the second layer as before

Drawers only covered at the front otherwise they won't slide easily
 

Add decorations and number in a random fashion

This looks wonky but its the camera angle :-(


Top


Min scroll inside the last box
A letter from Santa
I just love the cute appeal of it.  I have made one before HERE which is substantially larger which I love but this one is for my Grandsons.  I hope it can take the rigors of two small boys :-)

Useful links:
Pre-made boxes to buy
Template
Super large size template
More templates
Matchbox fun things to try